Processing my digital photos part 3

Now that I’ve got my photos safely stored so that I won’t loose the originals and, I can edit to my hearts content without loss of quality, I’m ready for the main work.  For the details of how I got here, read the first two parts of this series here and here.

Retouching the photos is the longest portion of my digital photo workflow. I won’t try to cover image enhancement in detail as there are many web sites with detailed information on the various techniques. One tip I do want to point out is, don’t always jump to use brightness and contrast adjustment for poorly lit photos. With underexposed and overexposed photos I most often find the best correction technique is to add layers and set the blend mode to compensate for the poor exposure. Overexposed photos are corrected with layers set to multiply blend mode, underexposure is compensated using screen blend mode. Once you have a blend layer setup you can strengthen the effect by simply duplicating the blend layer. To achieve dodging and burning effects, add masks to the screen and multiply layers. It can be time consuming but I think the results are worth the effort, here’s a couple examples.

This photo of a Rainbow Lorikeet at the Brevard Zoo is horribly underexposed.

dcp01898org

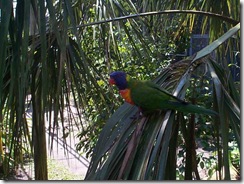
By duplicating the image to a new layer, setting the blend mode to screen and duplicating the new layer two times the photo is rescued from the dustbin.dcp01898

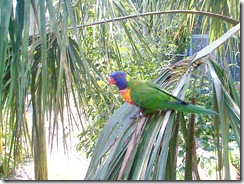
Due to the poor natural lighting, the original photo is overexposed in the upper right and underexposed in the lower left.dcp01411org1

By adding both a masked screen layer and a masked multiply layer the poor lighting is evened out.dcp01411

With the retouching finished the next step is to export the photo as a JPEG file into the JPEG directory I’d previously setup (see part 1 for details of my directory structure). In my preferred photo editing program, Paint Shop Pro, their are multiple ways to perform this function. For single photos there is a JPEG export command and the file “save as” command, when I have multiple photos to export I use the batch processing feature.

Now I’m ready to create albums on CDs for my family and friends and another album for my web site. In the past I used JASC’s Media Center Plus with customized templates to create albums like this 2002 Olympics album. Sadly that application was discontinued years ago so I needed to find something current.

I tried out many free and commercial products but one stood out from the rest, the open source JAVA based JAlbum. This photo album application is extremely customizable and has many skins available so everyone should be able to find a combination they like. I’ve chosen the Chameleon skin by Lazaworx for all my albums so far and have been very pleased with the ease of use and flexibility.

Paint Shop Pro Tutorials

Processing my digital photos part 2

In part one I started describing my work flow for handling digital photos and gave my reasons for developing and using it. This part starts off by inserting a new step in my previously described standard work flow. Before making the image files read-only I now add information to the EXIF data contained in the files. Adding information at this point in the work flow ensures that title, location, etc., info will stay with the photo through all edited versions and copies.

While a quick look might make you think EXIF is a nice consistent standard, my research quickly made me realize this is not the case. EXIF is so flexible that it is more appropriately thought of as an un-standard like PCB Gerber files (RS-274). As with RS-274, EXIF is so flexible that it is not practical for any one program to be able to handle all the possible variations.

The best solution I found for handling the majority of variations in this image metadata is ExifTool by Phil Harvey. This tool set is a Perl library and command line program that can manipulate nearly any piece of EXIF data. While a command line tool is very handy a GUI shell is often desirable and one is available for ExifTool at the HBx Hobbypage. The program, ExifTool GUI, gives you a file manager type interface that makes it even easier to edit EXIF image metadata.

I start off updating the EXIF data by batch adding information like artist and copyright using the command line ExifTool. The GUI tool gives me a shortcut for using the command line tool, when you right click the image’s directory you can select the “Open Command Window Here” item (AFAIK, this capability comes from Windows it isn’t a custom bit exclusive to the ExifTool GUI app). Selecting this menu item gives you a command prompt already located in the image directory ready to accept the command with parameters.

As a time saving shortcut I keep a little text file that has examples and previously used parameter sets. I construct a new command line or copy a previously used one from the text file and paste it into the command window. Here’s an example of a command line I’ve used to mass update image metadata.

"C:Program FilesEXIFtoolexiftool.exe" -Artist="Paul Hutchinson" -Copyright="Paul Hutchinson" -City="Disney World" -Province-State="FL" -Country-PrimaryLocationName="USA" *.jpg

Pressing enter updates all the images in the directory with this new/changed metadata in one quick command. The next step is to update the unique information like the image description using the ExifTool GUI program itself. If some images use the same data (e.g. exposure/composition variations deserving of the same title) then I use standard multiple selection techniques before activating the data editing function.

Once I have all the EXIF data updated, it’s now time to set the read-only attribute of the original image files so that they don’t get accidentally overwritten. The fast way I use is to press Control-A to select all the files in the ExifTool GUI and then press Alt-Enter to open the the standard Windows multiple file properties dialog box. When the multiple file properties dialog opens the “Read-only” checkbox is already in focus so, all I need do is hit Spacebar to mark the checkbox and then hit Enter to change all the selected files to read-only. This is easier to do than to describe in writing, after you’ve done it a few times it will become a fast four keystroke/combination keystroke operation (Ctrl-A, Alt-Enter, Spacebar, Enter). If you don’t or can’t get into the groove of using this quick keyboard operation, then give up on ever being efficient with computers and go ahead and click your way through the process using that killer of UI efficiency the mouse ;-). As an aside why can’t every computer user just stop clicking for Copy/Cut/Paste operations and just use the so much more efficient Ctrl-C/Ctrl-X/Ctrl-V keyboard combinations instead :-).

The next step is to convert the image files to a loss less format in preparation for editing (Note, ExifTool does not alter the image data so, even though technically it’s re-saving a compressed format, there is no data loss). For this conversion step I use PaintShop Pro’s batch conversion feature and its loss-less PSPimage file format. First I select all the originals in the PaintShop file browser (organizer in new versions) then select the “File-Batch Process…” menu item. This opens the batch process dialog with all the files listed in the “Files to process” list box. I set the “Save Mode:” to “NewType” and in the “Save Options” I select PSPimage in the “Type” drop down list and set the “Folder” to the root of particular images sub-directory structure (e.g. D:My Pictures2008-04-19). Finally click the “Start” button in the dialog and watch as the files are converted and copied to the new location.

With the files now in a safe format I can edit away to my hearts content knowing that if I screw things up royally I still have my originals to start over with. That’s all for part two in the series, part three will cover how I take the edited pictures the rest of the way to web/CD albums for others to enjoy.

Processing my digital photos part 1

Over the past month I’ve been revising the work flow for handling my digital photos. With the purchase of my first digital camera back in 2000 I soon realized the need to develop a methodology that kept my photos safe while being easy to find and backup. Keeping the flow simple was important to ensure that I would keep using it for years to come without needing major revisions.

Although I’ve been trying for forty years now, I have never become a really good photographer. The advent of digital photography and scanning of old film and slides to digital formats has been a lifesaver. I can, and usually need to, retouch my photos without spending hours per image in the darkroom. With the easy retouch capability of today it is all too tempting to simply fix the original photos and just save it. This is tempting for its simplicity but my experience has shown that with any original data I regret this choice later on. Once you have overwritten original data you can’t go back so, for all types of digital data I enforce a policy on myself of only modifying copies never the original.

The next consideration is the compression used in many digital image file formats. It is not uncommon for me to go through many retouch iterations before I am satisfied with the result. Being all too familiar with the way PC’s tend to crash at the worst possible time, I like to save my work frequently while working on images. To prevent the loss of image quality I prefer to use a loss-less file format for images while editing and then export to JPEG after I’m finished.

These considerations led me to setting up the first part of my workflow back in 2000. When I add images to my collection, I start by creating a subdirectory under my main image directory. This directory is named with the original date of the images using a year-month-day format of YYYY-MM-DD. I then create two subdirectories below the dated directory, one named Originals and the other named JPEG. The directory structure looks like this:

D:My Pictures
              2007-12-25
                          JPEG
                          Originals
              2008-01-08
                          JPEG
                          Originals

Now I copy the images to the Originals directory and set the files to read-only using normal file management tools. By setting the file attribute most programs will automatically prohibit overwriting the original image. The few programs I regularly use that will overwrite read-only files at least give a warning message when I attempt to overwrite the file.

That’s just about all I want to write up for part one of this series of posts. The final thing to cover is how I’ve automated the directory creation process. It only took a few weeks of using this procedure back in 2000 until I tired of manually creating directories. First I created a simple batch file but it was a messy solution so I whipped up a simple VB application. The app prompted for the date name with the current date preset but editable. Then simply clicking OK created the date named directory and the two subdirectories underneath it. I used that app for many years until I started using the open source, GPL licensed, AutoHotkey scripting language.

Here’s my current directory creating script:

; Create dated directory structure for images
; By Paul Hutchinson released to the public domain 2008
; Revised 1/9/2008

#SingleInstance ignore
#NoTrayIcon

; Assign the full path to the root of your picture directory to RootDir.
; Be sure to include the trailing backslash!
; e.g. C:Documents and SettingsusernameMy DocumentsMy Pictures
RootDir = D:My Pictures

InputBox, DirectoryDate, Create new pictures directory, Enter the date to use for the directory name (YYYY-MM-DD), , 375, 125, , , , , %A_YYYY%-%A_MM%-%A_DD%

if ErrorLevel ;User pressed cancel
ExitApp

; Create the new directory and subdirectories
FileCreateDir, %RootDir%%DirectoryDate%
FileCreateDir, %RootDir%%DirectoryDate%Originals
FileCreateDir, %RootDir%%DirectoryDate%JPEG

ExitApp